
Add Background Image To Folder In Windows Explorer
HII FRIENDS I M BAck with a new Trick Hope u Will enjoy this One........
Here it is....
When
you open drive or folder, You see white background.Even, if you change your
theme, your window explorer background remains white and its very common.Now
you can Add or Change background of any folders or Drives.
This Trick will let you add images as background
of the
folders or drives.It will set as wallpaper to that folder windows or drives.
Suppose we have two drive one for movies and other for songs.You can add or set background image for both drive.So when you open Movie drive,You will see movies background images and when you open songs drive, You will see album images as background.
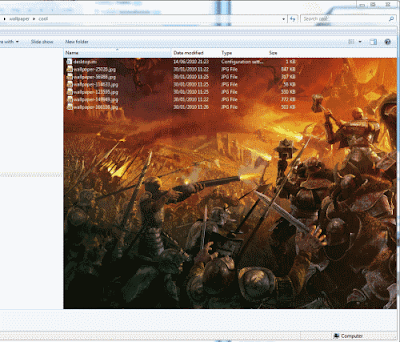
Below image shows that i have changed the background of My Document.
Suppose we have two drive one for movies and other for songs.You can add or set background image for both drive.So when you open Movie drive,You will see movies background images and when you open songs drive, You will see album images as background.
Below image shows that i have changed the background of My Document.

In the above image,i have changed
My Document Background Showing some Image,Which is looking Professional and
Cool.
To Set Or Add Image To Background of
window Explorer...
Follow this Simple Procedure...
1.} Go to Start >> All Program >> Accessories >> Open Notepad.
2.} Paste the Below Code in notepad.
Follow this Simple Procedure...
1.} Go to Start >> All Program >> Accessories >> Open Notepad.
2.} Paste the Below Code in notepad.
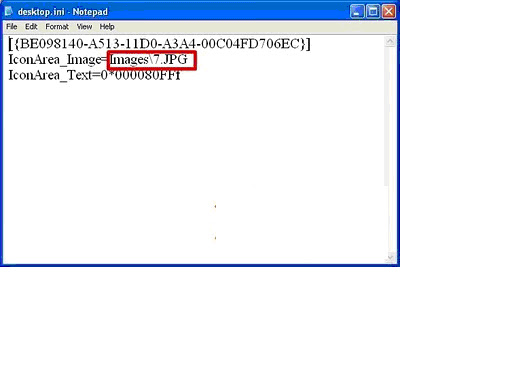
[{BE098140-A513-11D0-A3A4-00C04FD706EC}]
IconArea_Image=images\1.JPG
IconArea_Image=images\1.JPG
IconArea_Text=0*000080FFf
Copy
the code as Shown Above.The three line of code should on separate line as shown
above.
·
Now,
Save it as "Desktop.ini" without quotes .Save this file where you need
image background.Above Example shows that i have saved in My document.
·
Now,You need image for
background.Create a folder named Images and Copy images in that folder.Now give
the directory of the image location in the second line of coding. Suppose your
image name is my image.jpg which is inside the images folder,Then the directory
for this will be Images\my image.jpg.I have named my images with serial
number which make more easy to change images.
Now, we
have two files.First files is the code saved as Desktop.ini and other one is a
Folder named Images,Contains the images used for background.
Make Sure you specify, Correct Directories in Second Line of the code.
i.e IconArea_Image=IMAGES\7.Jpg
Third line of code specify icon text color.If background is black, Then change the text color to white.
NOTE:: Place the Images FOLDER and Desktpo.ini in the same folder whose background u want to chane
You can use this trick to any folder or drive, Even to Portable drives,Flash drives,Pen drives.Just Copy the image folder and desktop.ini, where u need image background.
Impress Your Friend using this trick, And also share with friends & Others!!!
ppLEASEE FOLLOW this blog and ADD COMMENT IF U HAV ANY PROBLEM PLEASEEEE SHARE THIS BLOG ON FACEBOOK / GOOGLE+ IF U LIKE IT AADISH


Fantastic post and Thanks for sharing this info. It's very helpful….
ReplyDeleteI am not getting it can any one help me??
ReplyDeleteI am not getting it can any one help me??
ReplyDeleteYa I m here ,,so wats the problem
DeleteSame thing. I did exactly as it was said to do. CODE:
ReplyDelete[{BE098140-A513-11D0-A3A4-00C04FD706DC}]
IconArea_Image=images\Megs.JPG
IconArea_Text=0*000080FFf
My image file is "images" and the file name is Megs. It is a JPEG file. I tried .JPG and .JPEG extensions, as well as renaming it to Megs.JPG and .JPEG, but it didnt work. Any ideas>
my dear friend you hv to right Megs.jpg instead of Megs.JPG
DeleteIf you are using Windows 7, then your desktop.ini file should contain these following codes
ReplyDelete[{BE098140-A513-11D0-A3A4-00C04FD706EC}]
[AveFolder]
IconArea_Image=
in the 3rd line after these words IconArea_Image= copy and paste the location of the image you want.
Hello there! I know this is kinda off topic but I'd figured I'd ask.
ReplyDeleteWould you be interested in exchanging links or maybe guest
authoring a blog post or vice-versa? My site covers a
lot of the same topics as yours and I believe we could greatly benefit from each other.
If you're interested feel free to shoot me an email.
I look forward to hearing from you! Awesome blog by the way!
my web page: blog how to make money online